

We are blessed to have a wonderful old cherry tree in the garden. Every year as its rosy tinted petals froth forth in Spring, I think how wonderful it would be to bring in a few bloom-laden twigs to cheer up the house.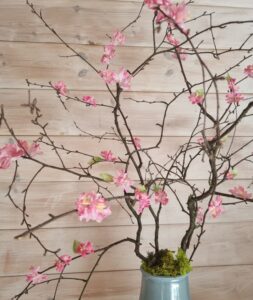
Within hours I am resentfully hoovering up all the petals as they immediately drop off and are tramped into every room, then throwing the twigs out of the back door in a minor grump. Here then is the answer; pretty little flowers that will add some glorious colour to your home without ending up stuck to your socks.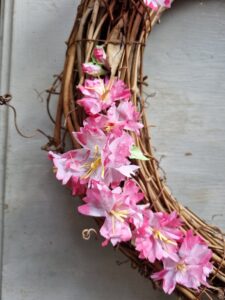
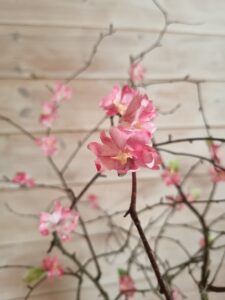
The cherry blossoms are made from tissue paper hoarded from my online purchases and the stamens from used white envelopes; both also work well when made with thin copy paper, and I have made them quite successfully with an old paperback book. About fifty were used for the tree in the picture, but I carried on making a few extra and glued them onto a grapevine wreath and some slices of kitchen roll tube to make attractive little napkin rings; our Cosy Night Out craft club ladies had such a fabulous evening making these trees and left with so many ideas of how else to use them!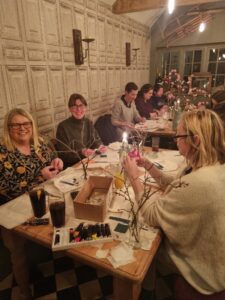
Materials
A dry branch
White tissue paper (if it is crumpled just smooth it out as best you can)
White envelopes
PVA glue
Hot glue gun
Watercolour paints and brush
A suitable jug
Sand or gravel to hold the branch in place
Moss (either dried or fresh)
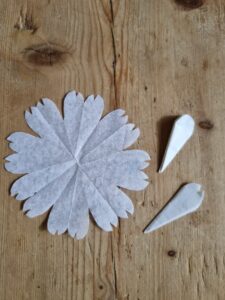
- Prepare the flowers by cutting fifty 6 by 6cm squares of tissue paper.
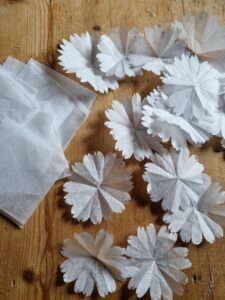
- Fold each one in half, corner to corner, then fold again three more times until you have a pointy triangle.
- Holding the triangle by the point, cut a curve into the opposing end to make a teardrop, then snip a tiny V from the rounded end. Carefully undo the tissue and lay your flower out flat, repeating with the rest of the squares.
- Using dark pink watercolour paint, mix up a fairly watery batch and generously daub over the petals of the first tissue flower to stain it pale pink. While the tissue is still wet, brush on more of the same paint (at a slightly thicker consistency) to give a lovely natural effect.
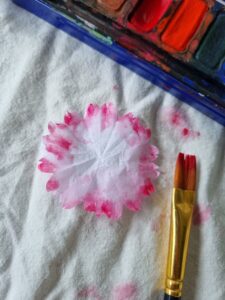
- Set aside to dry and then repeat with the other flowers; I find leaving them to dry on an old tablecloth works very well as they are easily removed afterwards, whereas left on paper sometimes they can become inadvertently attached.
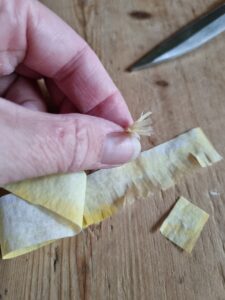
- To make the stamens, cut the white envelopes into strips 2cms wide, then snip 1.5cm deep cuts along the strips to make a fringe; try and make the cuts as close together as possible as this makes the stamens easier to deal with. For fifty blossoms you will need approximately 50cms of fringing.
- Apply a generous layer of yellow watercolour paint to both sides of the fringes and leave to dry.
- To assemble the stamens, cut a 1cm wide section of fringe and paint a little PVA glue to the uncut end. Fold it over a couple of times then roll between your finger and thumb so everything is nicely bonded together. Repeat another forty-nine times!
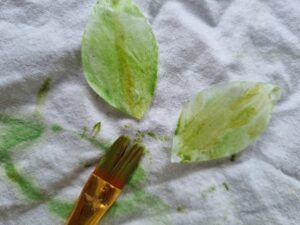
- The leaves are created by folding a length of tissue paper into a concertina and then cutting a leaf shape (roughly 3cms by 2cms) into the bundle. Undo the bundle and remove the leaves, then paint each one a spring green on both sides before setting aside to dry.
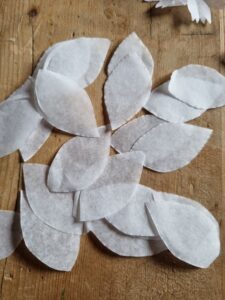
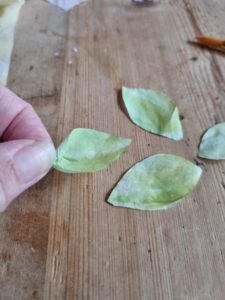
- Once dry, hold the tip of each leaf between the finger and thumb of one hand, then twist the opposing point with the other; this should result in a little cup shape.
- Take a tissue flower and, pushing the end of your paint brush into the centre, fold the petals up around it, pinching them firmly at the base.
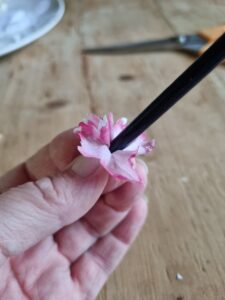
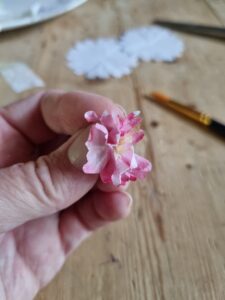
- Take the paint brush out, dip the bottom of one of your stamen bundles into a healthy dollop of glue and then insert into the hole. Pinch the base again and then roll between your fingers so the flower retains its shape then gently arrange the petals and stamens to your artistic satisfaction. Repeat with the rest of the flowers.
- To assemble the tree, simply place the branch in the jug and then fill with sand or gravel to keep everything upright. Using the hot glue gun, add scant blobs of adhesive to add first the leaves then the blossom to the twigs; the wood must be absolutely dry or you may find that after all that the flowers do indeed drop off!
- Lastly, tuck a little moss around the top of the jug, adding any spare blossoms to finish it off.